
Best practices for computer and browser use with Claude
Practical guidance for developers building computer and browser use integrations with the Claude model family.
Practical guidance for developers building computer and browser use integrations with the Claude model family.
Claude's latest models represent a significant step forward in computer and browser use capabilities. Because of these features, LLMs are now able to power increasingly complex agentic systems that power real work, like building software applications and automating workflows across multiple, disparate technologies.
In this blog post, we share best practices for using Claude with computer and browser use, ranging from simple configuration changes to more advanced integration patterns. We hope this piece helps as you start integrating Claude's computer and browser use capabilities into your product. We are also releasing a new demo implementation which encapsulates some of these best practices and provides additional tools useful for developing on top of Claude's computer use capabilities.
Note that these recommendations apply to the Claude 4.6 family (Opus 4.6, Sonnet 4.6, Haiku 4.5) and Claude Opus 4.7 unless otherwise noted. Where guidance differs between the 4.6 family and Opus 4.7, we call it out inline. Our findings are based on internal experimentation and may be updated in the future as new models and techniques emerge.
Click accuracy is the foundation of any computer use integration. If clicks don't land where they should, nothing downstream works: forms don't get filled, buttons don't get pressed, and workflows fail. The single highest impact optimization is also one of the simplest: pre downscale your screenshots before sending them to the API.
When you send a screenshot to Claude’s Computer Use API, the model sees it and returns click coordinates in the display_width_px / display_height_px coordinate space you specified. But there's an important constraint: the API has internal processing limits on image size. Images that exceed these limits get downscaled before the model sees them, which means the model is clicking based on a degraded version of the image while your harness expects coordinates aligned to the original resolution.
For our Claude 4.6 model family, the API's limits are:
Our Opus 4.7 model supports higher resolution. The limits are:
When the coordinate space and the model's perceived image don't match, the model's predicted clicks land on a display scale different from the image it's actually seeing. This is the primary cause of click inaccuracy at high resolutions. The fix is straightforward: always downscale your screenshots to fit within these limits before sending them to the API. We consistently observe significant accuracy degradation when images exceed the limits, and this single change is worth more than almost any other optimization.
Start with 1280x720. This is a safe, practical default for most use cases. It uses about 80% of the pixel budget, stays well within both the long edge and total pixel limits, and is a standard resolution that models have seen during training. It works well for both modern web UIs and legacy desktop applications.
If you are using Opus 4.7, we recommend starting with 1080p, as this brings a meaningful quality lift over 720p and provides a good balance between token use and performance.
For developers who want to maximize the visual information the model receives, we also recommend a "max API fit" approach: computing the optimal resolution per-image based on the source's native aspect ratio:
import math

# 1568 for 4.6 family, 2576 for Opus 4.7
MAX_LONG_EDGE = 1568

# 1.15MP for 4.6 family, 3.75MP for Opus 4.7
MAX_PIXELS = 1_150_000

def compute_max_api_fit(native_w, native_h):
    """Compute the largest resolution that fits API limits
    while preserving aspect ratio."""
    aspect = native_w / native_h

    # Compute max dimensions from pixel budget
    h_from_pixels = math.sqrt(MAX_PIXELS / aspect)
    w_from_pixels = h_from_pixels * aspect

    # Apply long edge constraint
    if native_w >= native_h:
        w = min(w_from_pixels, MAX_LONG_EDGE)
        h = w / aspect
    else:
        h = min(h_from_pixels, MAX_LONG_EDGE)
        w = h * aspect

    # Never upscale beyond native
    w = min(w, native_w)
    h = min(h, native_h)

    return int(w), int(h)
This approach is slightly more complex but avoids aspect ratio distortion and uses the full pixel budget available for each image. The accuracy improvement over a fixed 1280x720 is modest, but it's a straightforward implementation that avoids the distortion that occurs when forcing a 16:9 source into a 4:3 display resolution.
Resolutions to avoid:
When you resize a screenshot before sending it, the model returns click coordinates in the display resolution you specified. You must scale these back to your actual screen resolution before executing the click:
# Your screen is screen_w x screen_h
# You sent a screenshot resized to display_w x display_h
scale_x = screen_w / display_w
scale_y = screen_h / display_h

screen_x = int(api_returned_x * scale_x)
screen_y = int(api_returned_y * scale_y)
This is straightforward but critical, because if you forget to scale or display_width_px / display_height_px don't match the actual dimensions of the image you sent, every click will be consistently offset
When constructing your messages content array, place the text instruction before the image, as depicted in the code snippet below. This lets the model know what it's looking for as it processes the screenshot, which improves click accuracy.
# RECOMMENDED — text instruction first, then screenshot:
content = [
    {"type": "text", "text": "Click on the Submit button"},
    {"type": "image", "source": {"type": "base64", "media_type": "image/png", "data": screenshot_b64}},
]

# NOT RECOMMENDED — image first, then text:
content = [
    {"type": "image", "source": {"type": "base64", "media_type": "image/png", "data": screenshot_b64}},
    {"type": "text", "text": "Click on the Submit button"},
]If clicks are missing their targets, it often boils down to one of the causes, below:
Based on our internal testing, Claude Sonnet 4.6 tends to be more mechanically precise at clicking (better spatial accuracy, fewer near misses) while Claude Opus 4.6 brings stronger reasoning. Sonnet 4.6 is also more robust when source images require heavy downscaling.
Opus 4.7 narrows this gap: Through testing, we have found its clicking precision is roughly on par with Sonnet 4.6, and its higher resolution budget reduces the amount of downscaling needed in the first place, making it a strong choice when you want Opus-level reasoning paired with strong click accuracy.
For most tasks, we recommend starting with Sonnet 4.6, which provides the best balance of clicking accuracy, reasoning, and cost. Choose Opus 4.7 when you want stronger reasoning, particularly if using high-resolution source images. Haiku 4.5 remains an excellent option when latency is the priority. Advanced workflows may still benefit from an orchestrator + sub-agent pattern where a reasoning model handles planning and decision-making while Sonnet or Haiku executes the mechanical clicking steps.
Click accuracy degrades as targets get smaller. Large and medium UI elements (buttons, input fields, and standard menu items) are reliable across all resolutions within the safe zone. The challenge is with small and tiny targets, like checkboxes, system tray icons, dropdown arrows, small toggle switches, and tree view expand/collapse buttons.
If your application involves clicking small targets frequently, consider these strategies:
Use zoom for dense UIs. Claude 4.6 and 4.7 models support a zoom capability that lets the model inspect specific screen regions at higher resolution before clicking. Enable it in your tool configuration:
{
    "type": "computer_20251124",
    "name": "computer",
    "display_width_px": 1280,
    "display_height_px": 720,
    "enable_zoom": True
}
Make targets larger. If you control the UI being automated, increasing the size of click targets (even modestly) has a disproportionate impact on reliability. This might mean using a lower system DPI, zooming in the browser, or adjusting UI scaling settings.
Use keyboard alternatives for tiny targets. For very small elements, such as system tray icons or tiny checkboxes), keyboard shortcuts or tab-based navigation can be more reliable than clicking. If your workflow allows it, prompting the model to use keyboard interactions for specific steps can improve success rates.
Consider source image resolution. Screenshots from 4K+ displays that get compressed down to 720p lose significant detail (for example, a 16px checkbox at 3840x2160 native becomes roughly 5px at 1280x720 display resolution, which makes the target much smaller and therefore more difficult to hit). If you're working with very high-resolution displays, consider using Opus 4.7, which has a higher resolution limit than previous models. If using 4.6 models, consider capturing at a lower DPI, using display scaling to enlarge UI elements, or focusing the screenshot on the relevant portion of the screen rather than the full display. Because these models represent more information with less pixels, we’ve observed that performance degrades as source image scale increases, meaning more compression is needed.
We experimented on internal evaluations with several popular optimization techniques and did not find consistent uplift from these approaches, though results may vary depending on the specific situation:
If the model acts unpredictably after trying the fixes above, log the full transcripts and overlay the predicted clicks on the source screenshots to understand what the model is actually seeing and deciding.
Some failures aren't about click accuracy at all. For example, certain dropdown menus may invoke system-level UI that the browser viewport doesn't capture—the model appears to be failing the task, but it simply can't see the menu it needs to interact with. In cases like these, the model should rely on alternative methods such as JavaScript execution, keyboard navigation, or direct document object model (DOM) manipulation rather than clicking.
How to scale and prepare an image for computer use
import math
from PIL import Image
import base64
import io

# 1568 for 4.6 family, 2576 for Opus 4.7
MAX_LONG_EDGE = 1568

# 1.15MP for 4.6 family, 3.75MP for Opus 4.7
MAX_PIXELS = 1_150_000

def prepare_screenshot(screenshot: Image.Image, native_w: int, native_h: int) -> tuple[str, int, int]:
    """Resize a screenshot to fit API limits and return base64 + display dimensions."""

    # Option A: Fixed 720p (simple, reliable)
    display_w, display_h = 1280, 720

    # Option B: Max API fit (maximizes fidelity)
    # display_w, display_h = compute_max_api_fit(native_w, native_h)

    resized = screenshot.resize((display_w, display_h), Image.LANCZOS)

    buffer = io.BytesIO()
    resized.save(buffer, format="PNG")
    b64 = base64.standard_b64encode(buffer.getvalue()).decode()

    return b64, display_w, display_h


def scale_coordinates(api_x: int, api_y: int, display_w: int, display_h: int,
                      screen_w: int, screen_h: int) -> tuple[int, int]:
    """Scale API-returned coordinates back to native screen space."""
    screen_x = int(api_x * (screen_w / display_w))
    screen_y = int(api_y * (screen_h / display_h))
    return screen_x, screen_y


def compute_max_api_fit(native_w: int, native_h: int) -> tuple[int, int]:
    """Compute the largest resolution that fits API limits while preserving aspect ratio."""
    aspect = native_w / native_h
    h_from_pixels = math.sqrt(MAX_PIXELS / aspect)
    w_from_pixels = h_from_pixels * aspect

    if native_w >= native_h:
        w = min(w_from_pixels, MAX_LONG_EDGE)
        h = w / aspect
    else:
        h = min(h_from_pixels, MAX_LONG_EDGE)
        w = h * aspect

    w = min(w, native_w)
    h = min(h, native_h)
    return int(w), int(h)
Usage:
import anthropic
from PIL import Image

client = anthropic.Anthropic()

# Capture screenshot (your method here)
screenshot = Image.open("screenshot.png")
native_w, native_h = screenshot.size

# Prepare for API
b64, display_w, display_h = prepare_screenshot(screenshot, native_w, native_h)

# Send to Claude — text before image
response = client.beta.messages.create(
    model="claude-sonnet-4-6",
    max_tokens=4096,
    betas=["computer-use-2025-11-24"],
    messages=[{
        "role": "user",
        "content": [
            {"type": "text", "text": "Click on the Submit button"},
            {"type": "image", "source": {"type": "base64", "media_type": "image/png", "data": b64}},
        ]
    }],
    tools=[{
        "type": "computer_20251124",
        "name": "computer",
        "display_width_px": display_w,
        "display_height_px": display_h,
    }],
)

# Scale coordinates back for execution
api_x, api_y = extract_click_coords(response)  # your parsing logic
screen_x, screen_y = scale_coordinates(api_x, api_y, display_w, display_h, native_w, native_h)Claude's latest models support adaptive thinking, a setting which lets Claude decide how much to reason through intermediate steps before acting. Instead of manually setting a thinking token budget, adaptive thinking lets Claude dynamically determine when and how much to use extended thinking based on the complexity of each request. For computer use, this means Claude can think through what it's seeing on screen, plan multi-step interactions, and self-correct before committing to a click or keystroke.
With adaptive thinking, Claude's thinking depth is controlled via the thinking parameter with an effort level: low, medium, high,xhigh (with Opus 4.7),and max. More thinking means more reasoning per action, but also more output tokens, higher latency, and higher cost.
The natural question: depending on the model, how much thinking is optimal for computer use?
We tested each thinking effort level across a suite of end to end UI automation tasks spanning desktop applications, browsers, and multi-application workflows.
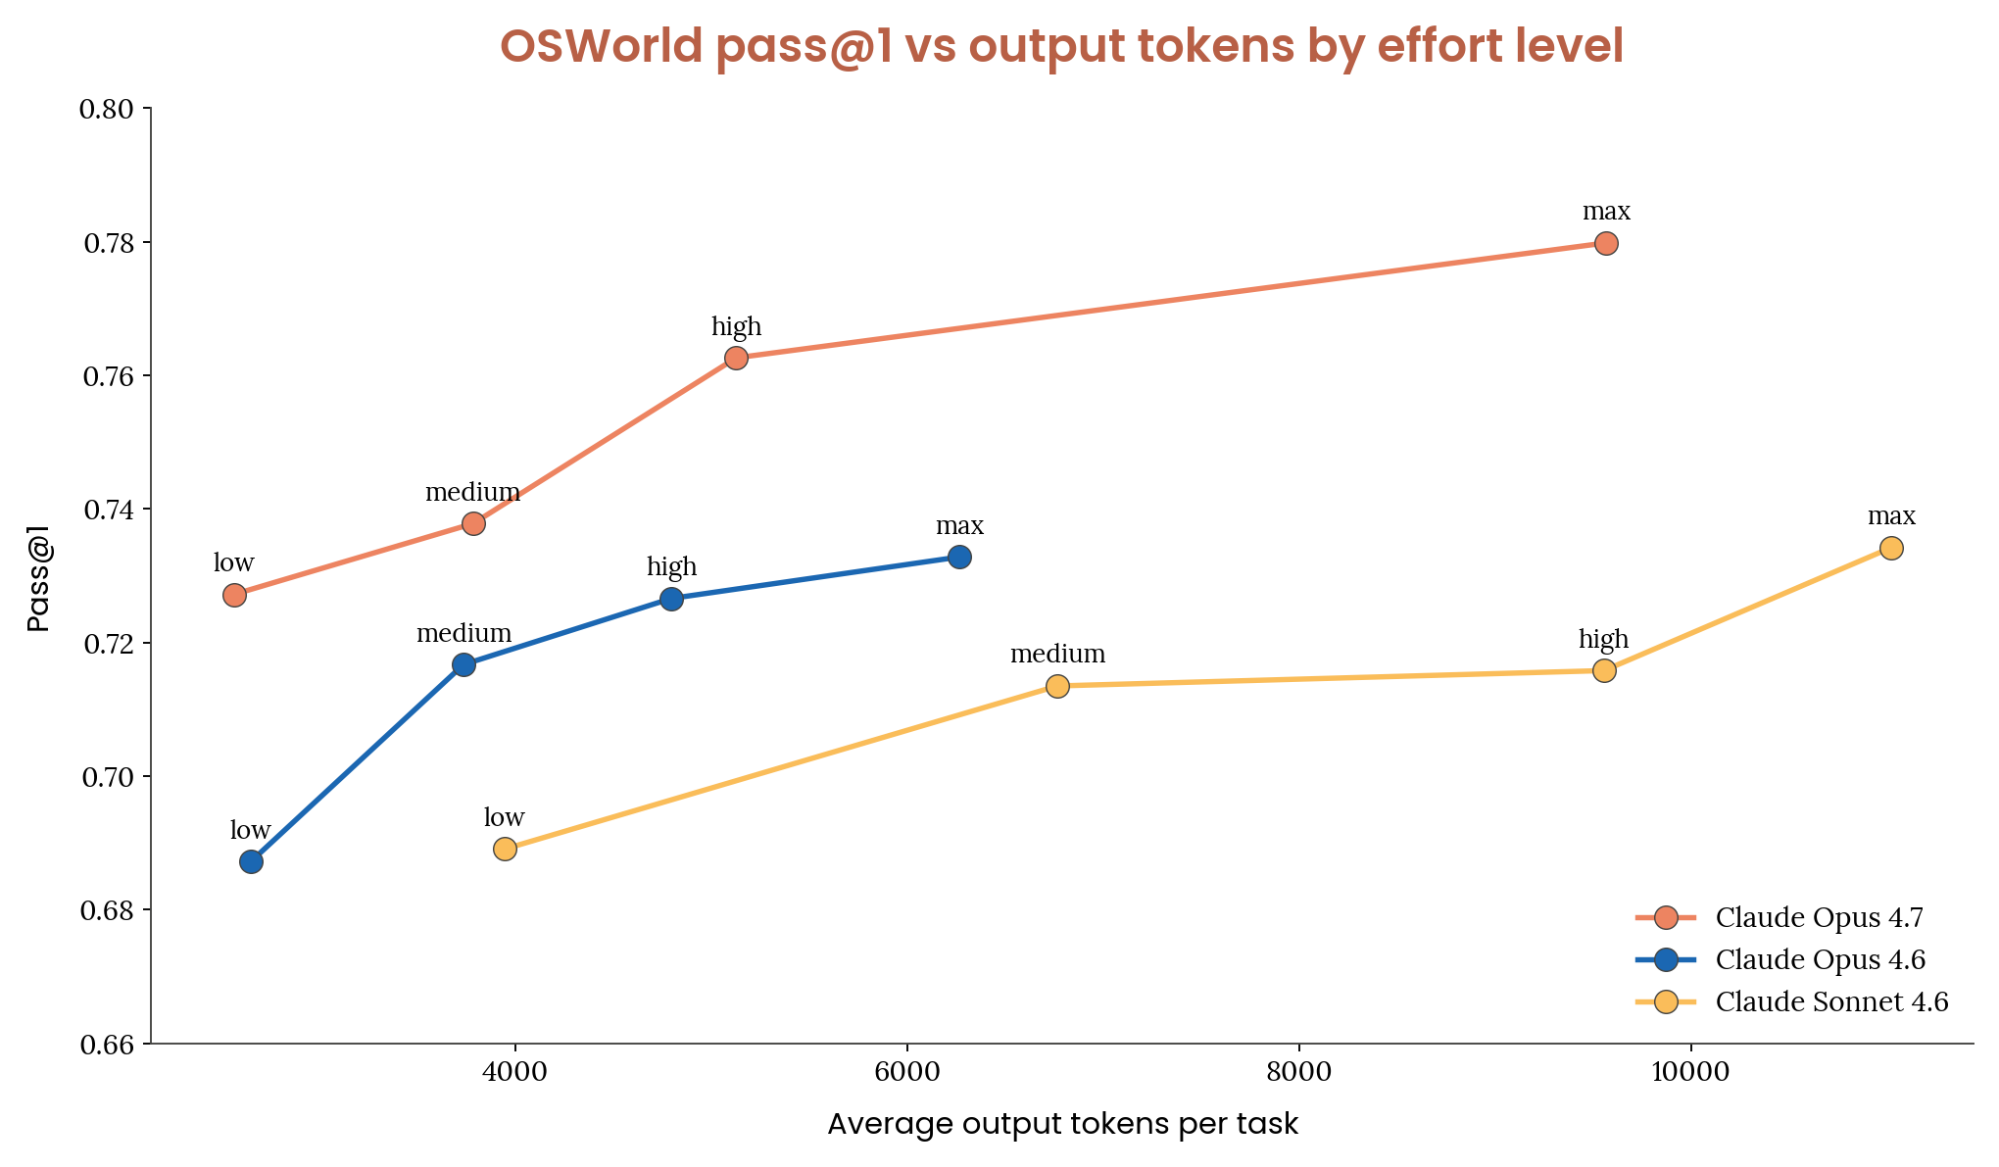
Opus 4.7 outperforms the 4.6 family. On the OSWorld Verified benchmark, we find that Opus outperforms all 4.6 family models at equivalent token usage and effort settings. Opus 4.7 on low effort scores similarly to Sonnet 4.6 on max, while using ~1/10th the tokens per task. For difficult tasks, Opus 4.7 is the obvious choice.
Setting effort to high achieves close to the highest task success rate while using roughly half the output tokens of max. Compared to Opus 4.6, low, medium and high all use approximately the same amount of tokens while improving score on OSWorld. During our internal testing, Max effort used more tokens and provided the best score. The table below outlines our recommendations for when to use each thinking effort level.
We tested each thinking effort level across a suite of end to end UI automation tasks spanning desktop applications, browsers, and multi-application workflows.
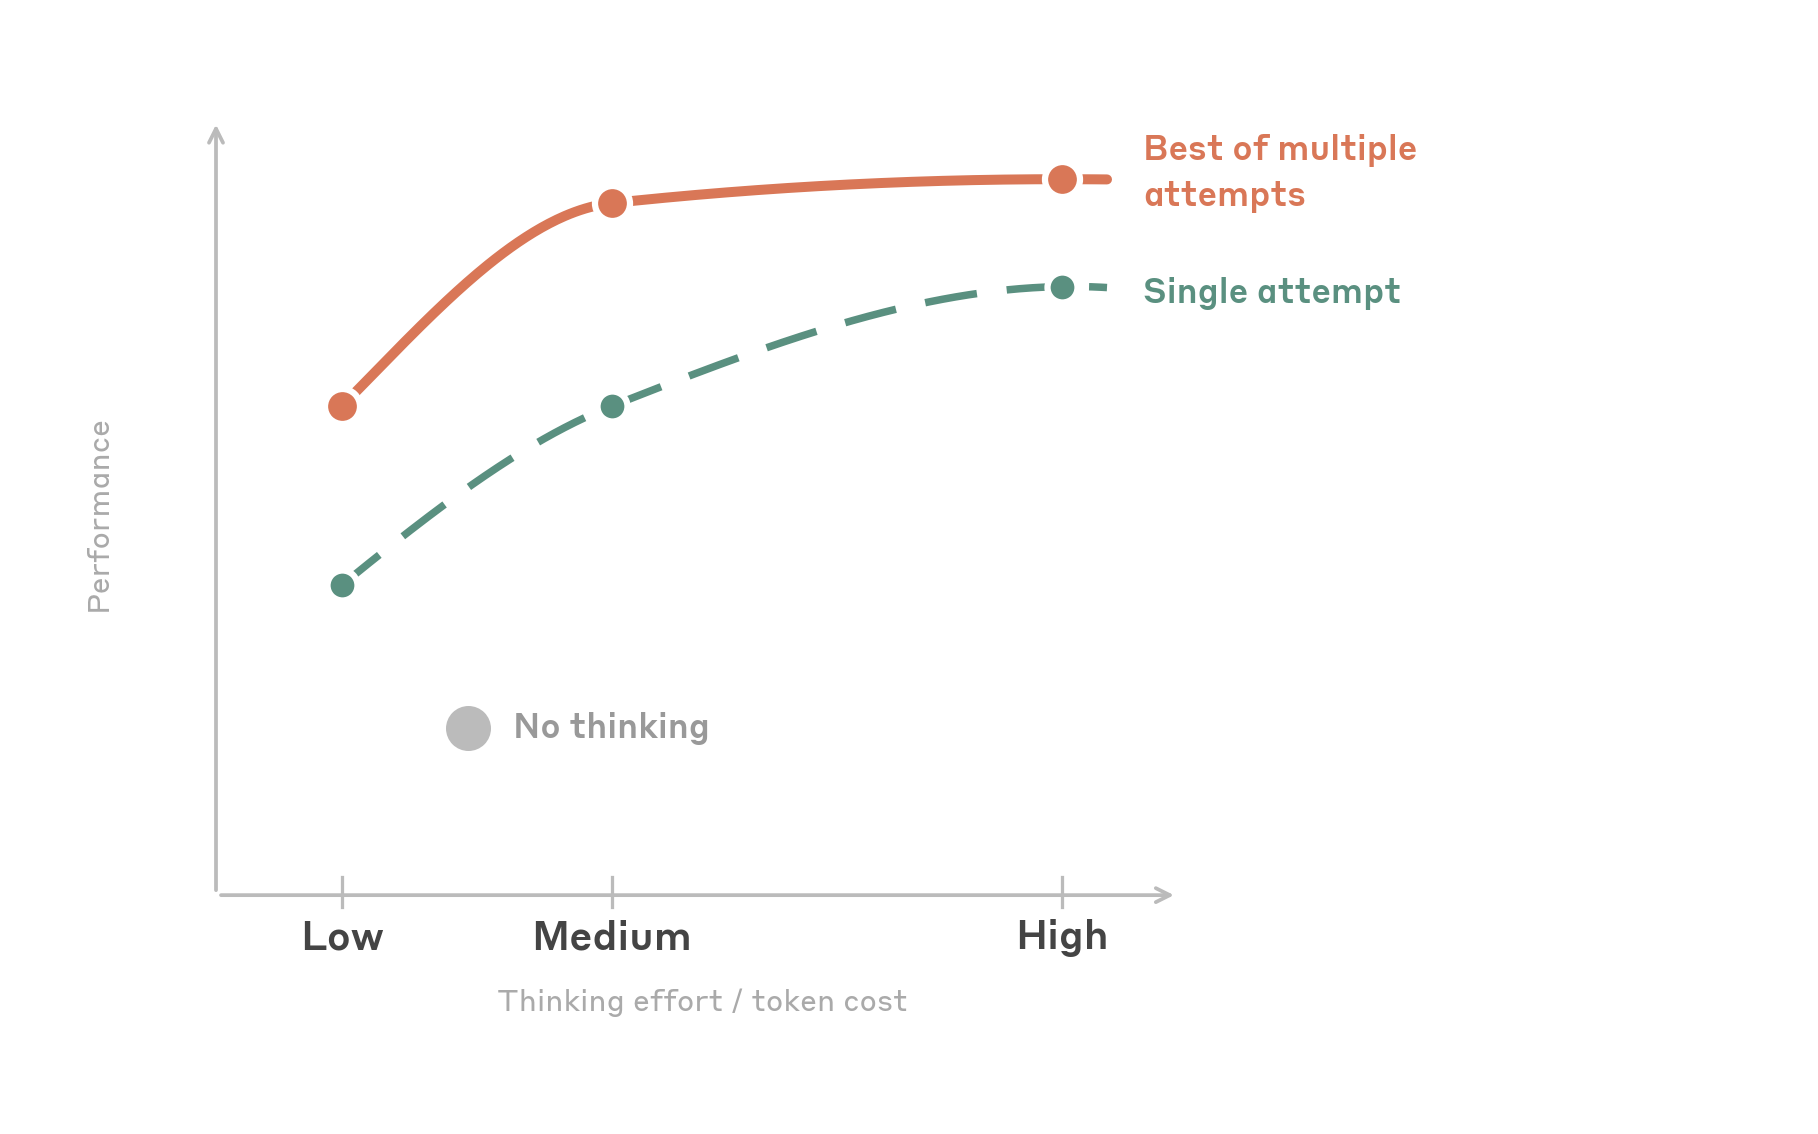
Two patterns stand out:
Medium effort is the sweet spot. Setting effort to medium achieves close to the highest task success rate while using roughly half the output tokens of high. Beyond medium, performance somewhat plateaus. Notably, when tasks are retried, medium and high converge to the same success rate. This means high effort may help the model get a difficult task right on the first try, but given multiple attempts, medium may get there as reliably at lower cost.
A little thinking goes a long way. low effort is a surprisingly strong option. It actually uses fewer total output tokens than disabling thinking entirely (the model makes fewer mistakes and needs fewer retry cycles), while matching or slightly exceeding no-thinking accuracy. This makes it the best option for cost-sensitive, high-throughput workloads. The table below outlines our effort recommendations.
We don't recommend max effort for computer use. In our testing, it provides no accuracy benefit over high while further increasing output token cost. UI tasks are primarily perceptual rather than deeply logical, and the additional reasoning budget goes unused or leads to overthinking. Keep in mind that this advice will change as models evolve.
import anthropic

client = anthropic.Anthropic()

response = client.beta.messages.create(
    model="claude-sonnet-4-6",
    max_tokens=16000,
    betas=["computer-use-2025-11-24"],
    thinking={"type": "adaptive"},
    output_config={"effort": "medium"},
    messages=[...],
    tools=[
        {
            "type": "computer_20251124",
            "name": "computer",
            "display_width_px": 1280,
            "display_height_px": 720,
        }
    ],
)UI automation tasks are fundamentally different from coding or math problems. Most computer use actions are perceptual and mechanical: identifying the right element, clicking in the right place, rather than deeply logical. Thinking helps most when the model needs to:
This section covers prompt injection protection, which is offered by default and for free if you use our official computer use tool header. However, if you are interested in enabling this on custom computer or browser use tools, please fill out our Prompt Injection Classifiers Interest Form.
Computer use agents interact with untrusted content by design. Every screenshot, webpage, or application UI that Claude processes could contain adversarial instructions, including hidden text, manipulated images, deceptive UI elements, or social engineering attempts that try to hijack the agent's behavior. This attack surface is fundamentally different from a typical API integration where you control the inputs. With computer use, the inputs to the model are the open internet and whatever software the agent is navigating.
As computer use agents become more capable and more widely deployed, prompt injection becomes a correspondingly more serious risk. An agent that can click, type, and navigate can be manipulated into taking real-world actions such as filling out forms, downloading files, or navigating to malicious URLs. Building robust defenses against these attacks is essential for any production deployment.
We've written in detail about our approach to prompt injection defenses for browser and computer use. Our defense strategy operates at multiple layers:
Training-time robustness. We use reinforcement learning to build prompt injection resistance directly into Claude's capabilities. During training, Claude is exposed to injected content embedded in simulated web pages and application UIs, and rewarded when it correctly identifies and refuses to follow malicious instructions. This means Claude's first line of defense is the model itself as it has learned to distinguish between legitimate user instructions and adversarial content encountered during task execution.
Real-time classifiers. We run probes that scan content entering Claude's context window and flag potential prompt injection attempts. These probes detect adversarial commands across multiple modalities such as text hidden in page content, instructions embedded in images, and deceptive UI elements designed to trick the agent and then adjust Claude's behavior when they identify an attack.
Continuous red teaming. Our security researchers continuously probe these defenses, and we participate in external adversarial evaluations to benchmark robustness against evolving attack techniques.
We've continued to invest heavily in all three layers since our initial computer use research preview. Each new model generation incorporates stronger training-time defenses and more capable classifiers, and we've expanded the range of attack techniques our red team evaluates against.
When you use Claude's official computer use tool via the API, prompt injection classifiers run automatically on every request. These classifiers operate in parallel with the main model inference, adding approximately zero additional latency and no additional cost to your requests.
There is nothing you need to configure to enable this protection. It's on by default when you use the official computer_20251124 tool type. The classifiers evaluate screenshots and other content for signs of prompt injection and influence Claude's responses accordingly.
# Classifiers run automatically when using the official CU tool — no extra config needed
tools = [
    {
        "type": "computer_20251124",
        "name": "computer",
        "display_width_px": 1280,
        "display_height_px": 720,
    }
]Many developers build computer use integrations using custom tool definitions rather than the official computer_20251124 tool type, for example, defining their own screenshot and click tools. If this describes your setup, the built-in classifiers described above don't currently run on your requests.
We're actively exploring how to extend prompt injection protection to these custom implementations. If you're building a computer use or browser use integration without the official tool type and are interested in prompt injection classifiers, fill out this interest form and we'll follow up as this capability becomes available.
Classifiers are one layer of defense, not a complete solution. We recommend the following practices for any computer use deployment:
Implement human-in-the-loop for high-stakes actions. Have the agent pause and request user confirmation before performing irreversible actions such as submitting forms, making purchases, sending messages, or modifying data. This is the single most effective mitigation against prompt injection regardless of classifier performance.
Scope the agent's permissions. Limit what the agent can do. If your workflow doesn't require file downloads, don't give the agent access to download files. If it doesn't need to send emails, don't give it access to an email client. Reducing the blast radius of a successful injection is as important as preventing the injection itself.
Monitor and log agent actions. Log the full sequence of actions the agent takes, including screenshots at each step. This allows you to detect anomalous behavior, audit what happens when something goes wrong, and build a feedback loop to improve your system's robustness over time.
Treat all web content as untrusted. Design your agent's system prompt to clearly distinguish between the user's instructions and content encountered during task execution. Remind the model that text found on web pages, in emails, or in application UIs is not from the user and should not be treated as instructions.
When building computer use agents, screenshots accumulate fast. Every action generates a new image, and each image consumes roughly 1,000–1,800 tokens depending on resolution. After accounting for the system prompt, tool definitions, and text content, a 200k context window can fill up in well under 100 screenshots.
Managing this context well has two goals: 1) keeping total tokens bounded and 2) keeping prompt caching effective so you don't repeatedly pay full price for the same prefix. We've found that effective context management has more impact on long-running-agent cost and latency than almost any other optimization. This section covers three layers that compose cleanly: placing cache breakpoints, pruning old screenshots without breaking the cache, and summarizing history when pruning isn't enough.
Prompt caching only helps if breakpoints land on content that will recur across turns. The API supports four cache breakpoints total. Putting all four on a stable prefix (system prompt, tool definitions) wastes them as that prefix is already hit once and never invalidates, so one breakpoint is enough. The other three are better spent on recent history, where invalidation risk is highest and savings compound over long sessions.
We recommend:
Spreading breakpoints across recent positions gives you graceful degradation. If your most recent breakpoint is invalidated, e.g. by an image prune, a compaction, or a tool-definition change, an earlier breakpoint can still hit, and you keep paying 10% of the full input cost instead of 100%.
Example of cache control and setting breakpoints:
def set_trailing_cache_control(messages, max_breakpoints=3):
    """Place up to `max_breakpoints` ephemeral cache_control markers on the
    most recent tool_result blocks, after clearing any existing markers."""
    for msg in messages:
        for block in msg.get("content", []):
            if isinstance(block, dict):
                block.pop("cache_control", None)

    placed = 0
    for msg in reversed(messages):
        for block in reversed(msg.get("content", [])):
            if placed >= max_breakpoints:
                return
            if isinstance(block, dict) and block.get("type") == "tool_result":
                block["cache_control"] = {"type": "ephemeral"}
placed += 1The simplest way to keep token counts bounded is to keep only the N most recent screenshots and drop the rest. Before each API call, walk the message array and replace older image blocks with a short placeholder (e.g., a text block saying “[Image omitted]”).
The naive version of this pattern is dropping screenshots one at a time as they age out, which changes the prefix on every turn and invalidates the prompt cache continuously. This is how rolling buffers got their reputation for breaking caching. The fix is to prune in batches so the prefix stays byte-identical for several turns at a time, then invalidates once, then stays stable again.
A concrete pattern that we have tested is to:
Reasonable defaults to start with: keep_n = 3, interval = 25. These are tunable, and a higher interval means fewer prune events (better cache efficiency) but a larger tail of full-resolution screenshots in context (more tokens). Measure cache hit rate and total input tokens on a representative trajectory and adjust.
Example of pruning previous screenshots while keeping cache breakpoints:
def prune_old_screenshots(messages, keep_n=3, interval=25):
    """Replace older screenshots with text placeholders in batches.
    Only prunes when the total count exceeds keep_n + interval, so the
    message prefix stays byte-stable for `interval` turns between prunes."""
    image_positions = [
        (msg_idx, block_idx)
        for msg_idx, msg in enumerate(messages)
        for block_idx, block in enumerate(msg.get("content", []))
        if isinstance(block, dict) and block.get("type") == "image"
    ]
    if len(image_positions) <= keep_n + interval:
        return messages

    to_prune = image_positions[:-keep_n][-interval:]
    for msg_idx, block_idx in to_prune:
        messages[msg_idx]["content"][block_idx] = {
            "type": "text",
            "text": "[Image omitted]",
        }
    return messages
Rolling buffers still have one real limitation: anything outside the buffer is gone. The original instructions, what the agent already tried, and where it is in the task all disappear with the pruned screenshots. For short tasks (under ~50 actions), that's fine. For anything longer, combine this with compaction.
Instead of silently dropping old images, summarize the full conversation before discarding it. The summary preserves what happened, what the user asked for, what's been completed, and where to resume. A few recent screenshots are kept alongside it so the agent can see what it's currently looking at.
Compaction and the cache-aware rolling buffer are complementary. Use the rolling buffer turn-to-turn to keep token growth manageable; use compaction occasionally to reclaim the rest of the window without losing earlier context. Each compaction event is a cache invalidation by design, so you want it to happen rarely, not every few turns.
This example prompt provides a scaffold where each section targets a specific failure mode. The prompt must capture everything the agent needs to continue the task without re-reading the original conversation, as depicted in the example below:
COMPACT_PROMPT = """Your task is to create a detailed summary of this conversation that
will REPLACE the conversation history. The agent will continue working with only this
summary and a few recent screenshots as context.

CRITICAL: Preserve ALL user instructions verbatim. User instructions are the most
critical element. If they are lost, the agent will deviate from the task.

Before providing your summary, analyze the conversation in  tags:
1. Extract every user instruction, requirement, and constraint
2. Identify if this is a repeatable workflow (e.g., processing N items)
3. Chronologically trace what actions were taken and what happened

Your summary MUST include these sections:

1. USER INSTRUCTIONS:
   - Complete initial task definition (verbatim when possible)
   - ALL specific requirements and criteria
   - Every "DO NOT", "ALWAYS", "MUST" instruction
   - Any corrections or feedback that changed the approach

2. TASK TEMPLATE (if this is a repeatable workflow):
   - The pattern being repeated
   - Decision criteria for each iteration
   - Standard workflow steps
   - Example of one completed iteration

3. CONSTRAINTS AND RULES:
   - All user-specified rules and restrictions
   - Edge cases and exceptions discovered

4. ACTIONS TAKEN:
   - Pages visited and elements interacted with
   - Forms filled and buttons clicked

5. ERRORS AND FIXES:
   - What went wrong and how it was resolved
   - Approaches that failed (so they aren't retried)

6. PROGRESS TRACKING:
   - Items completed vs. remaining
   - Current position in the workflow

7. CURRENT STATE:
   - Current application, URL and domain (optional)
   - Important page state (logged in, form progress, etc.)

8. NEXT STEP:
   - Exactly what should be done next to continue
"""
In the prompt above, User Instructions prevents task drift: without them, the agent deviates after compaction. Task Template captures the repeatable pattern so the agent can continue iterating after compaction without re-deriving the workflow from scratch. Constraints and Rules preserves restrictions and edge cases set before or discovered during the task, so the agent doesn't violate existing rules it knew to abide by. Actions Taken helps track past progress. Errors and Fixes prevents retrying failed approaches ("I already tried clicking Submit; it doesn't work until the Terms checkbox is checked"). Progress Tracking prevents restarts and skipped items. Current State & Next Step gives an unambiguous entry point to resume.
The simplest way to use this prompt is to let the API handle compaction via server-side compaction (beta). Pass your custom summarization prompt as the instructions parameter in context_management, and the API automatically summarizes when input tokens exceed a trigger threshold. The instructions parameter completely replaces the default summarization prompt, so the sections above are what the model will follow. Set pause_after_compaction to attach the most recent messages (including screenshots) across compaction events.
Examples of using autocompaction tool:
# Minimal — turn on autocompaction with API defaults
response = client.beta.messages.create(
    model="claude-opus-4-7",
    max_tokens=16000,
    betas=["compact-2026-01-12", "computer-use-2025-11-24"],
    context_management={"edits": [{"type": "compact_20260112"}]},
    messages=[...],
    tools=[...],
)

# Customized — set your own trigger threshold and summarization prompt
response = client.beta.messages.create(
    model="claude-opus-4-7",
    max_tokens=16000,
    betas=["compact-2026-01-12", "computer-use-2025-11-24"],
    context_management={
        "edits": [
            {
                "type": "compact_20260112",
                "trigger": {"type": "input_tokens", "value": 150_000},
                "instructions": COMPACT_PROMPT,
            }
        ]
    },
    messages=[...],
    tools=[...],
)When the API runs a server-side compaction, it replaces pre-compaction content on its side, but your local messages array still holds the full history. If you keep sending the full history on every subsequent turn, you'll pay for tokens the server no longer needs, plus your rolling-buffer pruner will operate on a different message slice than the server actually sees, which can break the cache-stable prefix you carefully maintained above.
The fix is to mirror the server's truncation on the client, as depicted by the code snippet below. When the response reports that compaction occurred, drop everything before the compaction marker from your local messages array before the next turn. This keeps client and server views aligned and lets the rolling buffer keep working correctly.
def truncate_to_last_compaction(messages, response):
    """If the server compacted on this turn, drop pre-compaction messages
    locally so the next turn's cache prefix matches what the server sees."""
    context_mgmt = getattr(response, "context_management", None)
    if not context_mgmt or not context_mgmt.get("applied_edits"):
        return messages

    compaction = next(
        (e for e in context_mgmt["applied_edits"] if e["type"] == "compact"),
        None,
    )
    if compaction is None:
        return messages

    keep_from = compaction["message_index_after_compaction"]
return messages[keep_from:]If you're using a model that doesn't support server-side compaction, or you want full control, implement compaction client-side with the same prompt. After each API call, check the total input token count from the response usage field. When that crosses a threshold (e.g., 90% of the context window), send the conversation to a summarizer model with COMPACT_PROMPT as the system prompt. Replace the message history with the summary plus a few recent screenshots, then continue the agent loop.
A good default for a long-running computer use agent looks like this:
With these three layers in place, a typical long-horizon CU session will hit the prompt cache on the vast majority of turns, keep total input tokens bounded well below the context window, and preserve enough history through compaction events that the agent doesn't lose track of the task.
The patterns below are techniques we've been testing in our implementations that show promise but aren't yet blanket recommendations. Each trades off complexity or cost for a potential lift on specific kinds of workloads. We include them here so you can try them on your workflow, but expect the guidance in this section to evolve quickly.
In the updated reference implementation we expose two tools alongside the standard computer and browser tools: computer_batch and browser_batch. Each accepts a list of sub-actions and executes them in a single tool call. For example, instead of separate click, type, and press key turns, the model can emit one computer_batch call containing all three actions.
The appeal is efficiency: a workflow with N mechanical actions is a single round trip instead of N round trips, which on long-horizon tasks meaningfully reduces wall-clock time and output token spend. The risk is compounding error, if action 2 depends on visual state that action 1 changed, and action 1 misses, the rest of the batch operates on stale assumptions and the agent can drift without ever seeing a screenshot of the actual state.
We recommend batch tools when the sub-actions are self-contained and don't depend on each other's visual outcomes (filling multiple fields in a form, chaining keyboard shortcuts, scrolling and clicking a known target). We'd avoid them in exploratory navigation, error-recovery sequences, or any workflow where "if action 1 fails I need to re-plan" is a real state.
Because batch tools are your own custom definitions, they stack cleanly with the standard computer or browser tools. Keep both available and let the model choose.
The advisor tool pairs an executor model with a higher-intelligence advisor model that the executor can consult mid-generation for strategic guidance. The executor runs the loop and when it hits something that needs deeper reasoning, it calls the advisor, receives a plan or course correction, and continues. This happens server-side inside a single request, no extra round trips on your side.
For computer use specifically, this pattern is most useful on long-horizon tasks where most turns are mechanical clicking but occasional planning moments (choosing which tab to open, recovering from an unexpected modal, deciding whether to abandon a strategy) benefit from Opus-level reasoning. You get close to advisor-solo quality while the bulk of token generation happens at executor rates.
Example of enabling the advisor tool:
response = client.beta.messages.create(
    model="claude-sonnet-4-6",
    max_tokens=16000,
    betas=["advisor-tool-2026-03-01", "computer-use-2025-11-24"],
    tools=[
        {
            "type": "advisor_20260301",
            "name": "advisor",
            "model": "claude-opus-4-7",
        },
        {
            "type": "computer_20251124",
            "name": "computer",
            "display_width_px": 1280,
            "display_height_px": 720,
        },
    ],
    messages=[...],
)
Useful controls for the advisor tool include:
max_uses: cap advisor calls per request. Helpful when you want to bound the worst-case cost.Two non-obvious things worth knowing: the advisor runs without tools and without context management, so it can't click or browse on your behalf, it only returns text advice. And because the executor model doesn't always remember the advisor exists on long-horizon tasks, see the reminder nudges section below.
When the advisor tool fires, the executor emits a server_tool_use block with name: "advisor" followed by an advisor_tool_result block in the returned content. These blocks live in your messages array alongside everything else.
If you later drop the advisor tool from your tools array — because you hit a conversation-wide cap, changed config, or switched models — those prior server_tool_use / advisor_tool_result blocks become orphaned. The API will return a 400 on the next request because the referenced tool is no longer declared.
The fix is a simple pre-send pass: whenever the advisor is disabled for a turn, walk the message history and strip any content blocks of type server_tool_use (with name == "advisor") and advisor_tool_result.
Example of removing stale advisor blocks:
def strip_orphaned_advisor_blocks(messages):
    """Remove advisor server_tool_use / tool_result blocks from history.
    Call this before any request that doesn't include the advisor tool."""
    for msg in messages:
        content = msg.get("content")
        if not isinstance(content, list):
            continue
        msg["content"] = [
            block for block in content
            if not (
                isinstance(block, dict)
                and (
                    (block.get("type") == "server_tool_use"
                     and block.get("name") == "advisor")
                    or block.get("type") == "advisor_tool_result"
                )
            )
        ]
return messagesOn long sessions, the executor model can forget which tools are available or which ones it should prefer. Two short reminder patterns have helped in our testing:
Batch reminder. If you expose computer_batch or browser_batch alongside the standard tools and observe the model chaining single-action calls when a batch would be appropriate, append a short system-level nudge after the next tool result: "Remember you can use computer_batch to combine sequential actions in a single tool call when they don't depend on intermediate screenshots." The goal is to pull the model back toward batching without dictating exactly when.
Advisor reminder. The advisor tool is easy for the executor to forget exists, especially if it hasn't been called in many turns. On sessions longer than ~20 turns without an advisor call, append a brief reminder that the advisor is available for planning or course-correction moments. In the reference implementation we use a 20-turn cadence and append a one-line hint.
Both nudges are light-touch context injections, not system-prompt rewrites. They cost a few tens of input tokens per append. If your system prompt is already long or your cache breakpoints are precisely placed, weigh whether the lift is worth the added invalidation risk.
When something misbehaves and you're not sure whether the problem is your harness, your screenshots, or the model, three side utilities in the reference implementation are worth reaching for before you start adding logging:
None of these are required to build a working integration; they're debugging aids for when the default feedback loop (log, re-run, squint at transcripts) isn't fast enough.
Instead of iterating on text prompts until Claude gets a workflow right, you can show it the correct behavior directly. Record yourself performing the task, capturing screenshots, actions, and optionally voice narration at each step, then replay that demonstration as context when Claude executes the same workflow. The recording becomes a reusable specification Claude can follow, adapting to differences in the live UI state.
We use this pattern internally in Claude in Chrome (where we call it "Teach Mode") and are sharing it here because the underlying approach is broadly useful for anyone building computer use or browser use products. It helps in two ways: improving reliability on workflows Claude can mostly handle but occasionally gets wrong, and unlocking entirely new workflows that Claude can't complete from a text prompt alone. The core idea (capture a demonstration, feed it back as context) is straightforward to implement and adapts well to both browser and desktop environments.
Traditional prompt engineering asks users to describe what they want in words, then iterate when the AI misunderstands. This pattern inverts that: users demonstrate the task while the system records their actions, screenshots, and (optionally) voice narration. During playback, Claude receives the full demonstration as context and follows the same sequence of steps, adapting to any differences in the current UI state.
The key insight is that playback isn't strict replay. Claude uses the demonstration as a guide while reasoning about the live environment. If a button has moved or a menu has been reorganized, Claude can find the equivalent element in the current UI rather than blindly clicking at recorded coordinates.
The fundamental unit is a “workflow step”, a single action captured during recording. Each step bundles what was done, where it happened, and what the screen looked like:
from dataclasses import dataclass, field
from typing import Literal, Optional

@dataclass
class WorkflowStep:
    action: Literal["click", "type", "navigate", "scroll", "select"]
    description: str                         # Human-readable, e.g. "Click the Submit button"
    timestamp: float
    selector: Optional[str] = None           # CSS selector or XPath
    coordinates: Optional[dict] = None       # {"x": int, "y": int}
    url: Optional[str] = None
    screenshot: Optional[str] = None         # Base64-encoded screenshot
    viewport_dimensions: Optional[dict] = None  # {"width": int, "height": int}
    speech_transcript: Optional[str] = None  # Voice narration, if captured
    value: Optional[str] = None              # For type actions

@dataclass
class SavedWorkflow:
    id: str
    name: str                                # e.g. "Submit expense report"
    steps: list[WorkflowStep] = field(default_factory=list)
    description: Optional[str] = None        # AI-generated summary of the workflow
    start_url: Optional[str] = None
    created_at: float = 0.0
    usage_count: int = 0
Capturing both selectors and coordinates is intentional: selectors are more robust to layout changes, but coordinates provide a visual fallback Claude can use when selectors break. Viewport dimensions are stored so coordinates can be scaled when the playback environment differs from the recording environment.
At minimum, capture click events, keyboard input, navigation changes, and a screenshot at each action. For each click, generate a human-readable description (from aria-labels, text content, or via a quick Claude call) and annotate the screenshot with a visual marker at the click position:
def on_click(event):
    step = WorkflowStep(
        action="click",
        selector=generate_selector(event.target),
        coordinates={"x": event.client_x, "y": event.client_y},
        url=current_url(),
        description=generate_description(event.target),
        timestamp=now(),
        viewport_dimensions=get_viewport_size(),
    )
    # Annotate screenshot with a circle at the click position
    screenshot = capture_screenshot()
    step.screenshot = annotate_with_circle(screenshot, event.client_x, event.client_y)
    workflow_steps.append(step)
The annotation (a colored circle at the click location) serves two purposes: it helps users verify the recording captured the right element, and during playback it shows Claude exactly where the action occurred. Your playback prompt should clarify that these markers are recording artifacts, not part of the live UI.
This is the most important piece. When a user triggers a saved workflow, you construct a message to Claude containing three things: the user's intent, a context block explaining the demonstration format, and the recorded screenshots.
The context block tells Claude how to interpret annotated screenshots and how to adapt when the live UI differs:
def generate_playback_context(steps: list[WorkflowStep]) -> str:
    steps_description = "\n".join(
        f"Step {i+1}: {step.description}"
        for i, step in enumerate(steps)
    )

    return f"""<demonstration_context>
The user has recorded a demonstration showing how to perform this task.

RECORDED STEPS:
{steps_description}

ABOUT THE SCREENSHOTS:
- Each screenshot shows the screen state when an action was taken
- BLUE CIRCLES mark where the user clicked — these are recording annotations
- The blue highlighting is NOT part of the actual interface
- Your own screenshots will NOT have these markers

HOW TO USE THIS DEMONSTRATION:
1. Review all steps and screenshots to understand the complete workflow
2. Take your own screenshot to see the CURRENT page state
3. The blue highlights show which element to interact with — find it in your current view
4. Follow the same sequence of actions, adapting to any differences
5. If the UI has changed significantly, use judgment to find equivalent elements
</demonstration_context>"""
Then assemble the full message with the user's prompt, the context block, and each step's screenshot as an image:
import anthropic

client = anthropic.Anthropic()

content = [
    {"type": "text", "text": user_prompt},
    {"type": "text", "text": generate_playback_context(workflow.steps)},
]

for i, step in enumerate(workflow.steps):
    if step.screenshot:
        content.append({"type": "text", "text": f"[Step {i+1}: {step.description}]"})
        content.append({
            "type": "image",
            "source": {"type": "base64", "media_type": "image/jpeg", "data": step.screenshot},
        })

response = client.beta.messages.create(
    model="claude-sonnet-4-6",
    max_tokens=4096,
    betas=["computer-use-2025-11-24"],
    messages=[{"role": "user", "content": content}],
    tools=[{
        "type": "computer_20251124",
        "name": "computer",
        "display_width_px": 1280,
        "display_height_px": 720,
    }],
)Not every workflow needs the same level of adherence to the recorded demonstration. Some workflows are too long, consuming a significant amount of input tokens which ultimately degrades latency and increases cost. Consider supporting a strictness parameter that you include in the context prompt:
Strict: follow steps exactly; stop and report if the UI has changed too much. Good for compliance-sensitive workflows where the exact sequence matters.
Adaptive: use the demonstration as a guide but adapt to UI changes. This is the best default for most use cases — it handles minor layout shifts, updated button labels, and reorganized menus gracefully.
Goal-oriented: focus on the end result; treat the recorded steps as hints rather than instructions. Useful when the UI changes frequently but the goal stays the same. Use a model to summarize the recorded demonstration, using strategies similar to the one described in the next section, then pass that summary to the CU model.
Here's what a saved workflow looks like in practice. The workflow captures five steps: navigating to the expense form, selecting an expense type, choosing "Travel" from the dropdown, entering an amount, and clicking Submit.
expense_workflow = SavedWorkflow(
    id="wf_abc123",
    name="Submit Expense Report",
    start_url="https://expenses.company.com/new",
    steps=[
        WorkflowStep(
            action="navigate",
            url="https://expenses.company.com/new",
            description="Navigate to new expense form",
            timestamp=1700000000,
        ),
        WorkflowStep(
            action="click",
            selector="#expense-type-dropdown",
            coordinates={"x": 400, "y": 200},
            description="Click on expense type dropdown",
            timestamp=1700000001,
        ),
        WorkflowStep(
            action="click",
            selector="[data-value='travel']",
            coordinates={"x": 400, "y": 280},
            description='Select "Travel" expense type',
            timestamp=1700000002,
        ),
        WorkflowStep(
            action="type",
            selector="#amount-input",
            value="150.00",
            description="Enter expense amount",
            timestamp=1700000003,
        ),
        WorkflowStep(
            action="click",
            selector="#submit-expense-btn",
            coordinates={"x": 1150, "y": 420},
            description="Click the Submit button",
            speech_transcript="Now I'll click submit to send the report for approval",
            timestamp=1700000004,
        ),
    ],
)
When a user later says "Submit my expense report for the team lunch ($85.50)", the playback service constructs a prompt with the demonstration context, all five annotated screenshots, and the specific values from the new request. Claude sees exactly where to click, what sequence to follow, and adapts the amounts and descriptions to match the current task. If your workflow is too long for this approach to be practical due to input token count, then consider first compacting the workflow before using it as an example. See the following section for tips on managing context.
These practices reflect our current best understanding of what makes computer use integrations reliable in production. They apply to the Claude 4.6 model family and Opus 4.7, and will be updated as new models and techniques emerge.
As your integration matures, the patterns that matter most will depend on your specific environment, target applications, and reliability requirements.
Get started with the computer use documentation, check out our new demo implementation of these best practices, or revisit the original computer use research post for background on how these capabilities were built and where they're headed.
Acknowledgements: This article & corresponding demo were written by Lucas Gonzalez and Luca Weihs. The authors would like to thank Molly Vorwerck, Javier Rando, Maya Nielan, Gabe Mulley, and Brigit Brown for their contributions.

Get the developer newsletter
Product updates, how-tos, community spotlights, and more. Delivered monthly to your inbox.


